Currently I have my monitors propped up on top of another pair of speakers - but I am looking to get stands so I can put the other speakers back into storage for the summer.
besides the usual cheapo quick lock stuff - anything out there worth considering?
Monitor stands - what are you folks using?
-
Milkmansound

- george martin
- Posts: 1253
- Joined: Sun Feb 22, 2004 3:15 pm
- Location: San Francisco, CA
- Contact:
Monitor stands - what are you folks using?
(((((((((((((((((((((((((())))))))))))))))))))))))))))
www.pedalsteelamp.com
www.milkmansound.com
Follow me on Facebook!
www.pedalsteelamp.com
www.milkmansound.com
Follow me on Facebook!
-
Professor
- ghost haunting audio students
- Posts: 3307
- Joined: Wed May 07, 2003 2:11 pm
- Location: I have arrived... but where the hell am I?
I have a set of those Middle Atlantic stands holding up the foldback pair in the live room. I was worried about buying them without seeing them in person first because I wanted something really stable in there so students wouldn't knock them over and kill speakers on me. They haven't let me down. Very heavy, very sturdy, rather attractive, and they have a cute little double channel down the back of the pedestal where I ran a 12' IEC power cord and a 12' XLR cable for a nice, clean install. The only catch is that they are not height adjustable and they price in at the level of most quality speaker stands.
-Jeremy
-Jeremy
-
MASSIVE Mastering

- buyin' a studio
- Posts: 852
- Joined: Mon Aug 23, 2004 6:09 pm
- Location: Chicago (Schaumburg / Hoffman Est.) IL
- Contact:
-
Russian Recording

- re-cappin' neve
- Posts: 752
- Joined: Wed May 21, 2003 2:28 pm
- Location: Bloomington, IN
- Contact:
These, made by Ultimate Support are actually really good, sturdy and relatively affordable:
http://www.sweetwater.com/store/detail/MS36B2/
I filled mine with lead shot. I am pretty picky about stuff being crap, and these are not crap. They really are good.
mike
http://www.sweetwater.com/store/detail/MS36B2/
I filled mine with lead shot. I am pretty picky about stuff being crap, and these are not crap. They really are good.
mike

I went to Home Depot and got some 3/4 inch planks of MDF, about 18 inches on each side. I got some 1/2 inch threaded rod and drilled holes in the MDF. I threaded the rod through the holes and tightened it up with bolts. They are super sturdy and I've gotten lots of compliments on their appearance! Plus they are continously adjustable and you can put as many pieces of MDF on as you want for shelves. I know they're not filled with sand or anything, but the Auralex MoPads give 'em pretty good isolation. All in all the project cost less than 100 bucks, I think the threaded rod was the most expensive part at $8 apiece or something.

Made my own monitor stands:
- some extra 3/4" plywood i had (leftover from other projects) for the platforms and base.
- ABS pipe (3" thickness) connected to the platforms/base with:
- closet flanges (bolted down)
- Sand (the abs pipes are caulked on the inside and filled w/ sand)
- paint
Instead of painting mine a standard black color, I opted for a deep deep red.
I love em. And I didn't pay much at all-- gotta love plumbing supplies. This is obviously not a good solution if you don't like building things. But I do.
I also made my own with PVC pipe and toilet flanges. or closet flanges if you prefer. I actually haven't gotten around to painting mine yet, so they look like exactly what they are. (not a great thing) they aren't adjustable, you just have to make them the height you want. They work well and the project runs under $30.
-
justhitthebutton
- gettin' sounds
- Posts: 129
- Joined: Sat Dec 11, 2004 10:00 pm
- Location: houston tx
I made mine as well. Made the the height i wanted. I ripped some MDF down to 4" width, pilot drilled countersunk nails, and caulked the seams. then attached a 1 foot square bottom. I filled this MDF tube with sand that i bought at home depot as well. I put on the same size top and then used drywall screws going through the base from the topside of the 1 foot sqaere bass as levelers and excellent isolators from the floor. Each base only touches the floor with the 4 extremely tiny sharp points of the drywall screws. Hello low end.
can it really look better than it sounds?
-
Professor
- ghost haunting audio students
- Posts: 3307
- Joined: Wed May 07, 2003 2:11 pm
- Location: I have arrived... but where the hell am I?
Out of curiosity, did you know about these guys when you built that stand?A-Barr wrote:I went to Home Depot and got some 3/4 inch planks of MDF, about 18 inches on each side. I got some 1/2 inch threaded rod and drilled holes in the MDF. I threaded the rod through the holes and tightened it up with bolts. They are super sturdy and I've gotten lots of compliments on their appearance! Plus they are continously adjustable and you can put as many pieces of MDF on as you want for shelves.

I had seen their furniture at a local hifi store when I was in school and decided I'd make my own. I found that the expensive part was the nuts since I made a set with 5 shelves and except for the top, each shelf got 8 nuts for a total of 36 at about 80 or 90 cents each (I went with 5/8-11 in stainless). They're great though, and I eventually made a second shorter one which is still sitting behind me in my living room while the tall one is in my office at school.
I did also do a DIY set of speaker stands that had mixed results.
I bought 8 pre-cut 24" x 6" x 3/4" poplar boards from the depot and one 36" x 8" x 3/4" board. I routered one edge on each board into a dado joint (or is it rabbet on the end like that?) and glued four together into a square column. Then I cut the 8" board into four 8x8 squares for tops & bottoms. Finished them in clear Verathane, and they looked gorgeous. Then I tried to fill them with half-way concrete and didn't have them clamped while it dried, so the seams were pushed out a little bit and when I filled the remaining half with sand one of them leaked a little.
They still looked very nice and worked exceedingly well (though of course, not height adjustable). When I moved, I dumped the sand and concrete and gave them to my kid brother.
-Jeremy
-
trodden

- on a wing and a prayer
- Posts: 5752
- Joined: Wed May 07, 2003 8:21 am
- Location: C-attle
- Contact:
Made mine from crap you find at home depot.
4 square concrete patio stepping stone things.
a tube of liquid nails type adhesive
that black plastic pipe, 4" diameter I think?
4 end caps for the plastic pipe with a large enough flange to adhere to the patio stones
a tube of playground sand to fill the pipe.
first, i glued the 4 end caps to the four patio stones and let them dry over night. next day attached the piping to two of the patio stones (bottoms) with a good amount of adhesive on the contact surfaces. fille the pipes with the sand and attached the other two patio stone/end cap fixtures (tops).
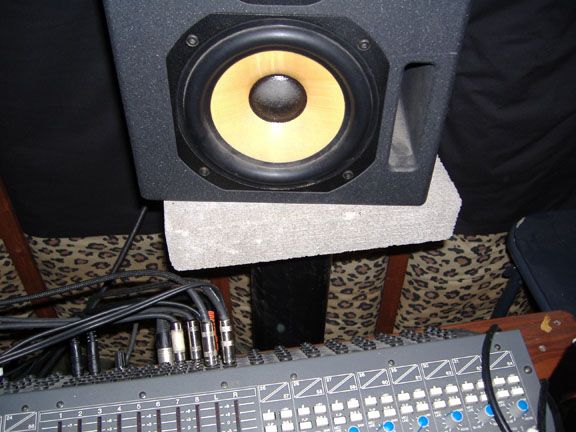
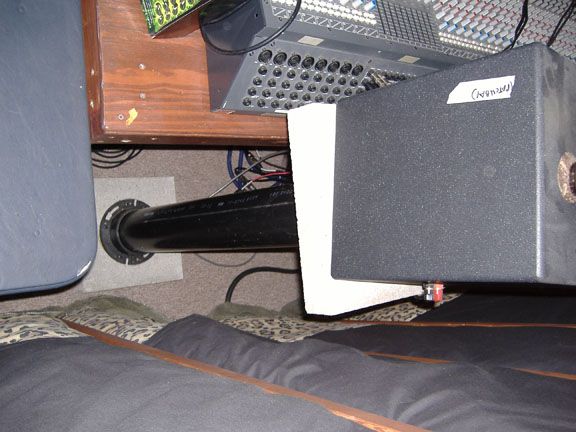
here are some pictures...
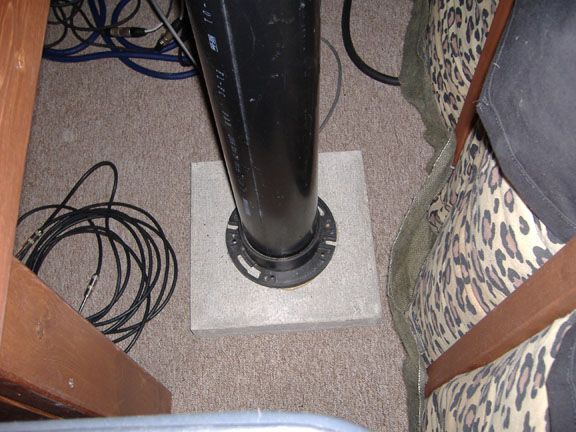
Just be sure to measure carefully and think it though before you start cutting your pipe. Keep in mind that the patio stone and the end cap will add a few inches to the overall hight.
4 square concrete patio stepping stone things.
a tube of liquid nails type adhesive
that black plastic pipe, 4" diameter I think?
4 end caps for the plastic pipe with a large enough flange to adhere to the patio stones
a tube of playground sand to fill the pipe.
first, i glued the 4 end caps to the four patio stones and let them dry over night. next day attached the piping to two of the patio stones (bottoms) with a good amount of adhesive on the contact surfaces. fille the pipes with the sand and attached the other two patio stone/end cap fixtures (tops).
here are some pictures...
Just be sure to measure carefully and think it though before you start cutting your pipe. Keep in mind that the patio stone and the end cap will add a few inches to the overall hight.
SoundAnchors
I got a pair of the adjustable Sound Anchors today. Incredible quality.
They are expensive, but buy it nice or buy it twice as they say. I never have to think about buying monitor stands ever again.
They are expensive, but buy it nice or buy it twice as they say. I never have to think about buying monitor stands ever again.
Who is online
Users browsing this forum: No registered users and 61 guests