
we're about to start some new recordings in our practice space, which is nice, but unfortunately has 6.5' ceilings. i want to treat the ceiling over and around the drum kit so as to take it out of the equation as much as possible.
the ceiling is rather thin plaster that has proven to be rather poor at holding weight, and we don't own the space so we can't booger it up trying.
anyone have any DIY ideas that would be relatively easy to implement, but still effective in terms of killing ceiling reflections/absorbtion... without ruining the ceiling?
treating ceiling over cymbals...
treating ceiling over cymbals...
"I try to hate all my gear equally at all times to keep the balance of power in my favor." - Brad Sucks
You want absorption up there. The more mass of absorptive material you put up there, the lower the frequency that will be absorbed.
For a recording space, absorbing reflections at all frequencies will create the illusion of a taller ceiling (to a point... your ceilings are pretty low).
If it was my space, I'd put ultratouch cotton batts up there, cover it with cloth, and attach the cloth somehow. Ultratouch compresses nicely so it takes up less space.
Ultratouch works great, and it is not toxic like fiberglass/rockwool, so it will be much less hassle when you remove it.

-
digitaldrummer

- cryogenically thawing
- Posts: 3525
- Joined: Wed Nov 23, 2005 9:51 pm
- Location: Austin, Texas
- Contact:
I think someone else posted on TapeOp recently a method for hanging "clouds" by putting screw-eyes on the walls, then running thin wires tightly across. Then they just laid OC703 or cotton batts, or whatever across the wires. I've been thinking about this myself because you could easily remove this if you wanted another sound. With glue, well... if you need a stronger solution you could even run them from the other walls too creating a sort of "mesh" over the kit. Can't remember who posted it but it was cool idea.
Mike
Mike
i'm driving up to rural northern ohio (cue the banjo music!) tomorrow night to pick up 2 bales of Ultratouch. getting a decent price on it and the place is only an hour and a half away.
also, that i have to drive that far gives me an excuse to buy WAY too much of the stuff. my hatchback will be stuffed with it.
i have what i consider to be an ingenious plan for how to install this stuff, but i'll wait to post details until after i figure out whether or not it will actually work in reality.
thanks all, for the suggestions!
"I try to hate all my gear equally at all times to keep the balance of power in my favor." - Brad Sucks
-
drumsound
- zen recordist
- Posts: 7485
- Joined: Tue Jun 01, 2004 10:30 pm
- Location: Bloomington IL
- Contact:
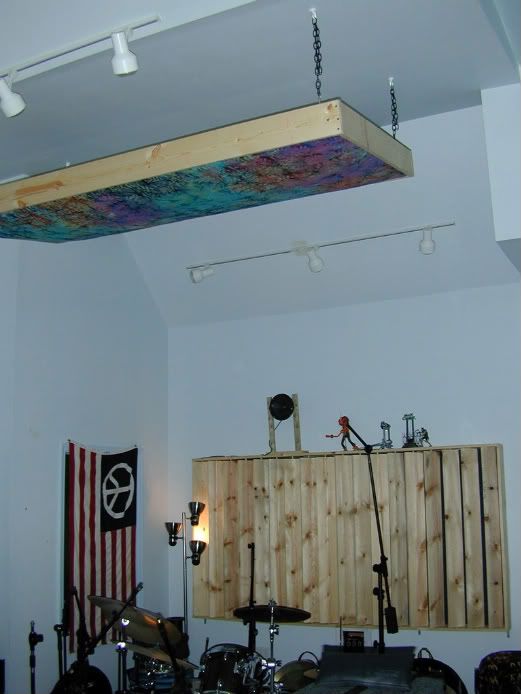
I made one with really simple parts from Lowes and an evenings time with a friend.
We made a 4'x8' rectangle box with three 1"x4" boards. One board was cut in half. Screw hooks were put int he corners. We stappled in so cool looking fabric to the inside. Pink insulation was rolled in the the box on top of the fabric. We put 4 anchor hooks in the ceiling and attached 4 equal lengths of chain with about 1" links. We used longer lenght so the distance from the ceiling can be altered.
Here it is:
-
digitaldrummer
- cryogenically thawing
- Posts: 3525
- Joined: Wed Nov 23, 2005 9:51 pm
- Location: Austin, Texas
- Contact:
-
chetatkinsdiet
- buyin' a studio
- Posts: 870
- Joined: Mon Jan 05, 2004 8:36 pm
- Location: dallas texas
I'd like to hear a little about that homemade diffuser behind the kit.drumsound wrote:I made one with really simple parts from Lowes and an evenings time with a friend.
We made a 4'x8' rectangle box with three 1"x4" boards. One board was cut in half. Screw hooks were put int he corners. We stappled in so cool looking fabric to the inside. Pink insulation was rolled in the the box on top of the fabric. We put 4 anchor hooks in the ceiling and attached 4 equal lengths of chain with about 1" links. We used longer lenght so the distance from the ceiling can be altered.
m
The only true great mic on this planet is the Shure SM-57. It is the most consistant in not totally sucking of anything ever built. All other mics are "application dependant".
-- Fletcher
-- Fletcher
those look really nice, Tony. thanks for posting that!
Seeking a low-weight solution, we ended up making a bunch of rigid-backed cushions out of the Ultratouch and 15"x40" pieces of foam-core board, nicely wrapped in fabric. They are very light. We screwed 1/4" x 3" slats of wood to the ceiling and walls around our kit, and attached the cushions to the slats with industrial strength Velcro. This is great because we can take them down and move them around as needed, in case we need some more treatment around a mic/amp or at our mixing desk.
They're holding strong after a long day of tracking drums, and they're making a significant difference in the sound we're getting. We're using a pair of Nady ribbons for the overheads, and they sound fantastic so far, even with the low ceilings. We're stoked!
I really want to post pictures but it's kind of dark down there and I haven't gotten good ones yet. When I get good pics I'll post them.
"I try to hate all my gear equally at all times to keep the balance of power in my favor." - Brad Sucks
-
myfipie
- gimme a little kick & snare
- Posts: 98
- Joined: Thu Nov 24, 2005 4:23 am
- Location: Atlanta, GA
- Contact:
or just do it like thisdigitaldrummer wrote:I think someone else posted on TapeOp recently a method for hanging "clouds" by putting screw-eyes on the walls, then running thin wires tightly across. Then they just laid OC703 or cotton batts, or whatever across the wires. I've been thinking about this myself because you could easily remove this if you wanted another sound. With glue, well... if you need a stronger solution you could even run them from the other walls too creating a sort of "mesh" over the kit. Can't remember who posted it but it was cool idea.
Mike

Glenn
GIK Acoustics
www.gikacoustics.com
www.gikacoustics.com
-
Ryan Silva

- tinnitus
- Posts: 1229
- Joined: Sat Aug 07, 2004 6:46 pm
- Location: San Francisco
Hey Tony, did you build that diffuser behind the kit? How well does that work?drumsound wrote:I made one with really simple parts from Lowes and an evenings time with a friend.
We made a 4'x8' rectangle box with three 1"x4" boards. One board was cut in half. Screw hooks were put int he corners. We stappled in so cool looking fabric to the inside. Pink insulation was rolled in the the box on top of the fabric. We put 4 anchor hooks in the ceiling and attached 4 equal lengths of chain with about 1" links. We used longer lenght so the distance from the ceiling can be altered.
Here it is:
"Writing good songs is hard. recording is easy. "
MoreSpaceEcho
MoreSpaceEcho
-
TapeOpLarry
- TapeOp Admin

- Posts: 1665
- Joined: Thu May 01, 2003 11:50 am
- Location: Portland, OR
- Contact:
Hey Tony, what's up with the hippy tie dye?
Larry Crane, Editor/Founder Tape Op Magazine
please visit www.tapeop.com for contact information
(do not send private messages via this board!)
www.larry-crane.com
please visit www.tapeop.com for contact information
(do not send private messages via this board!)
www.larry-crane.com
-
Professor
- ghost haunting audio students
- Posts: 3307
- Joined: Wed May 07, 2003 2:11 pm
- Location: I have arrived... but where the hell am I?
I guess I'm kinda hopping in here after you've already put absorption up on the ceiling, but I still think it's worth tossing in a different idea.
At 6.5 feet, I think that ceiling is way too low to try to absorb sound behind a pair of mics. If you lose 6" to panels and hang the mics another 6" down, you're at 5.5 feet and barely above the cymbals anyway - so you're pretty much close mic'ing cymbals and going to get very little good drum sound in the overheads.
A much simpler solution is to simply put the mics all the way up to the ceiling and make them PZM-style boundary mics. Once the capsule is up to within 1/3-inch from the surface, the ceiling is pretty much taken out of the sonic picture. You capture the sound arriving at the boundary, but not the reflections, unless you count the reflections that would bounce from ceiling to floor back to ceiling, but there's a drumset in the way there.
I'm not sure what mics you have to choose from, but if you had, say, a pair of SDC cardioids, you could tape them to the ceiling in a 90? XY pair above the drummer's head and you would get a nice, half-cardioid pair.
Now if you're recording the whole band at the same time in the same room, then absorption can help the rest of the mics, but it's good for others who might find themselves in a similar situation to know about this very cheap, and non-destructive solution.
-Jeremy
thanks, jeremy! we're trying to use several different mic setups to keep the drums from sounding the same for every song, so we'll definitely try that.
i'll say that given the limitations of the space, we have so far been very pleased (and to be honest, a bit surprised) with how well the drum sounds have been coming out.
i'll say that given the limitations of the space, we have so far been very pleased (and to be honest, a bit surprised) with how well the drum sounds have been coming out.
"I try to hate all my gear equally at all times to keep the balance of power in my favor." - Brad Sucks
-
drumsound
- zen recordist
- Posts: 7485
- Joined: Tue Jun 01, 2004 10:30 pm
- Location: Bloomington IL
- Contact:
Sorry I haven't checked this.
To answer the questions:
The cloud helped a great deal. That section of the room is pretty focused, yet I can still put mics in the rest of the room for a splashy sound to blend in.
The Diffusor was almost as simple as the cloud and made and installed the same night. It has Auralex screwed into the wall behind the louvers. All of the boards are 1"x4" like the cloud and the frame is exactly the same three 8' boards making a rectangle. The louvers are 8" boards cut in half. There are dowels in the middle of each end and holes in the frame. The louvers all rotate and can be opened up for an even drier sound. I move them around sometimes, but the difference is subtle, I think the cloud is what really brought the room into focus.
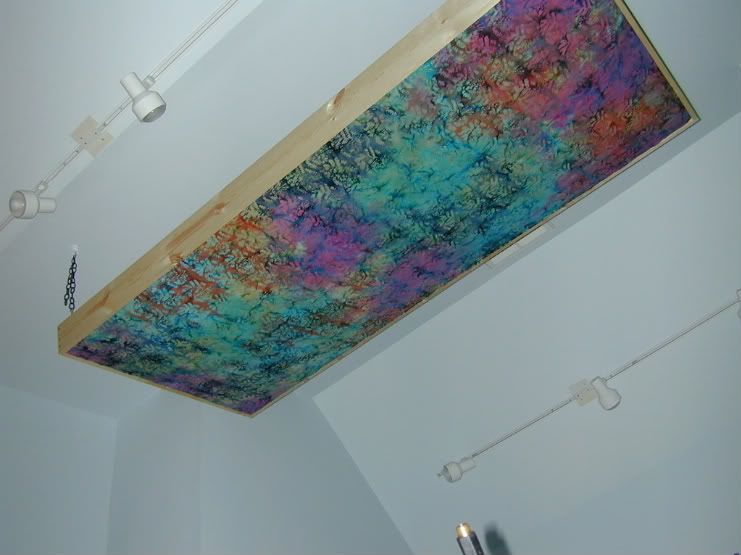
Larry, it's not tie dye, but more of a faux batik! The room is a pretty pale blue so bit of color is a nice thing. I do like the pale walls because I don't want people really thinking about the color, I want them thinking about the music. Plus I use lamps and it's never as bright as the picture unless I'm cleaning or doing some non-music work.
So there you have it.
To answer the questions:
The cloud helped a great deal. That section of the room is pretty focused, yet I can still put mics in the rest of the room for a splashy sound to blend in.
The Diffusor was almost as simple as the cloud and made and installed the same night. It has Auralex screwed into the wall behind the louvers. All of the boards are 1"x4" like the cloud and the frame is exactly the same three 8' boards making a rectangle. The louvers are 8" boards cut in half. There are dowels in the middle of each end and holes in the frame. The louvers all rotate and can be opened up for an even drier sound. I move them around sometimes, but the difference is subtle, I think the cloud is what really brought the room into focus.
Larry, it's not tie dye, but more of a faux batik!
So there you have it.
Who is online
Users browsing this forum: No registered users and 137 guests