
BTW, It would be really great if someone could put together or post a link to a pictorial explanation (better yet a vid) of the tape calibration process!
Tascam 388 User Guide and Service Manual courtesy of The Snowfields
Making a "Better" recording with a Tascam 388
____________________________________________________________
CLEANING
Heads-90% or better alcohol with qtips.
Pinchroller rubber-wet qtip, qtip with mild soap/water, damp rag.
Terry at Terry's Rubber Pinch Rollers says..
"What to use for cleaning pinch rollers and other rubber items."
Many people ask me what to clean their pinch rollers with. I wish I had a good super secret formula I used and could tell you about, but I don't.
I see daily and have heard what chemicals do to rubber, and it isn't good. Sooner or later the rubber will be ruined.
Some types of rubber dry out, crack, and get hard, while others get soft and gooey.
My advise and its only my opinion, and I know this doesn't clean as well as some high octaine chemical,
but I suggest just plain old dish soap and water, then rinse well. "
http://www.terrysrubberrollers.com/

(Pic from Terry's site. You don't actually have to peel the rubber ring off your
capstan to clean it, thankfully!
Demagnetizing
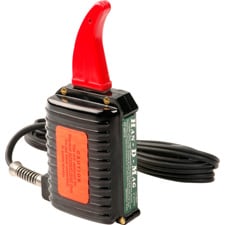
Annis Han-D-Mag demagnetizer
the industry standard
Tape deck cleaning and Demagnetizing primer
Demagnetization demonstration vid thanks j.harv (uh-oh..expert village)
________________________________________________________________________________________________________________
Tascam 388 DIY MAINTENANCE
According to Jimmy in Analog Support at the Montebello Tascam Repair Service Center,
http://tascam.com/contact/parts/
Ask for "analog support"
the most common reasons for 388 issues are:
loose or gooey capstan belts,
blown fuses and
motor failure
___________________________________________________________________
CAPSTAN BELT REPLACEMENT
While we're at it, another issue I had with mine was that the tape counter wheel wouldn't spin, so the readout wasn't working. Two things fixed this.shedshrine wrote:
Lay the deck face down and take off the back.
Take out a screw on one leg of the large wheel bracket, and loosen its other one, then slide the new belt under the free leg and put the belt around both wheels like this.
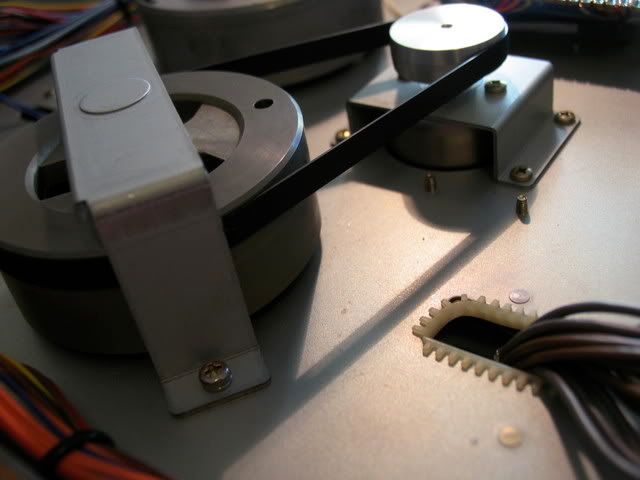

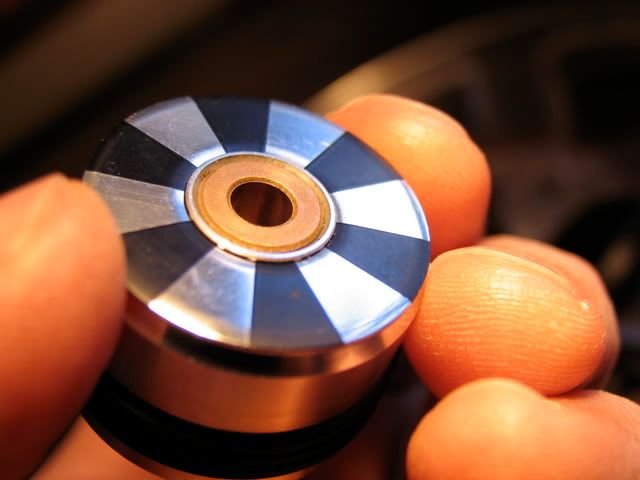
One was to scrub the rubber that contacts the tape with a damp qtip until it was nice and grabby.
(the black screw top cover on the left in this picture threads into the shaft the wheel rotates on and should come off easily with a good twist)
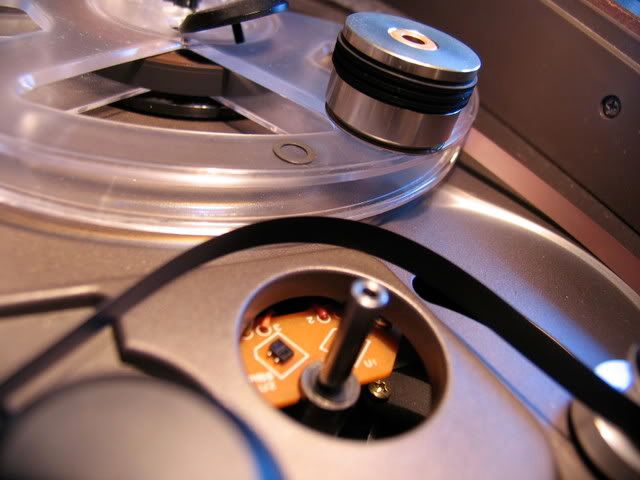
The second was to coat a little light machine oil on the shaft to allow the wheel to spin freely.
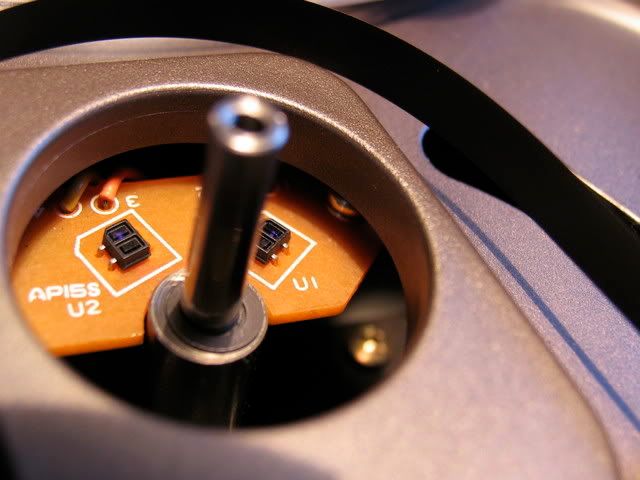
One of the things I read about that can also cause poor readout accuracy is if these little sensors get dusty.
They optically read the little stripes turning on the bottom of the wheel. Pretty cool.
____________________________________________________________________
Fuse replacement
Link to video of 388 transport problem due to bad fuse
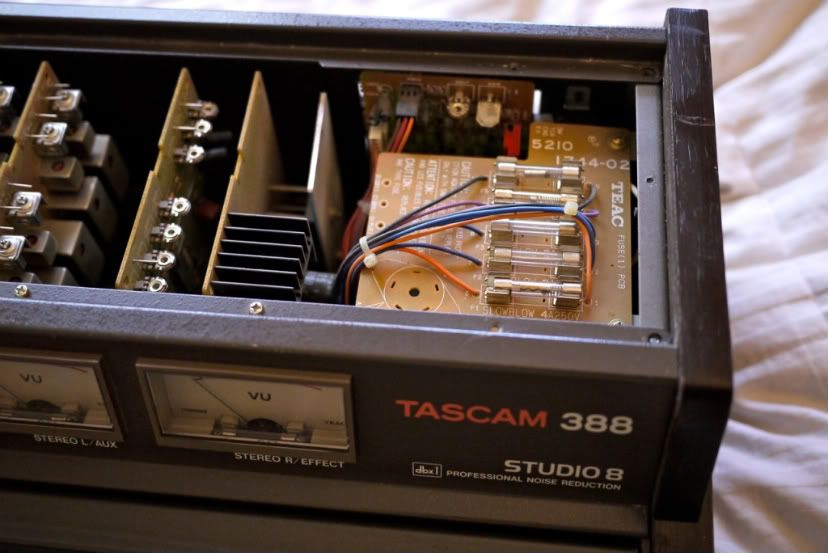
"I hope you didnt take it to a repair shop yet. Mine was having the same issue.
Pop the top panel off , youll see a set of 5 fuses. One or more of them are bad.
I just replaced all five of mine cause they were like a total of 6 bucks anyways.
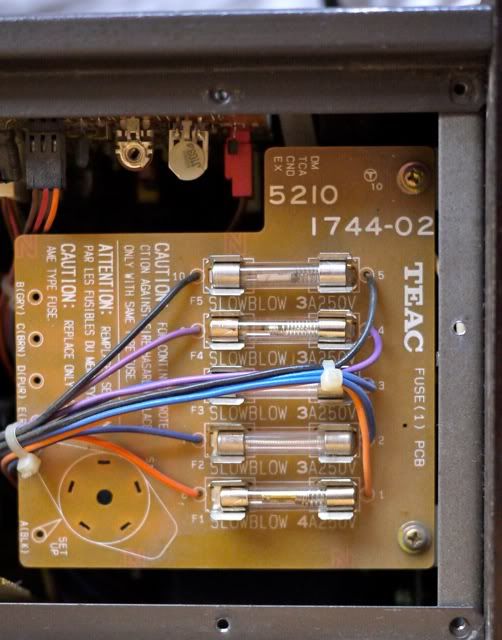
Some are 3A 250V slowblow fuses, one is a 4A 250V slowblow. So be sure to buy the correct ones. Its all clearly marked inside.
Any electronics store will have them . Good luck. -john "
ndecarmine wrote:I just got a replacement for the blown fuse - it's a 3A250V slow blow fuse, in the #3 position -
- however, the element looks difft than the previous one.
if I put this in, am I going to damage my board? does the interior construction of the fuse/element have to do with what it's related to on the board?
EDIT: I'm asking this specifically because on the board, next to the fuses, it says: 'caution: replace only with same type fuse', so I'm not sure if that simply means value or construction as well...
Beck on homerecording said:
Yes, you're fine. There are different approaches to fuse design, but they work the same way if rated the same. Position F3 is SLOWBLOW 3A 250 V. Any type that meets this description will work.
Beyond the Basics:_______________________________________________________________________
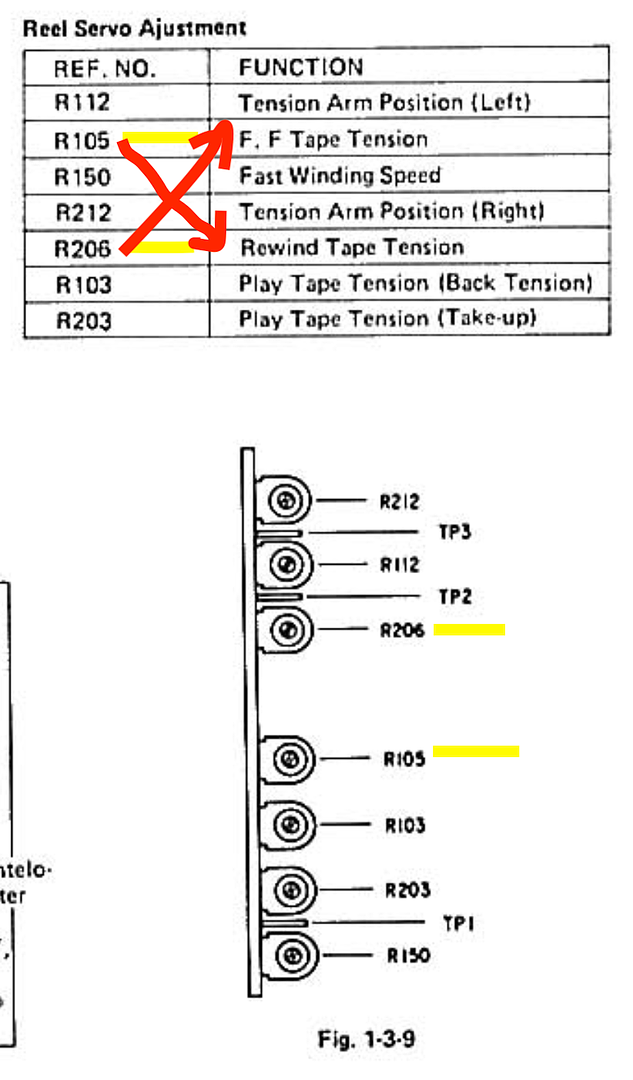
Reel Servo Tension Roller Adjustment (courtesy of ?Erockrazor?-homerecording)
The following process CAN help/cure playback, fast forward, and rewind issues on your Tascam 388.
A simple adjustment to the Reel Servo trim pots can adjust how your tape machine does these functions.
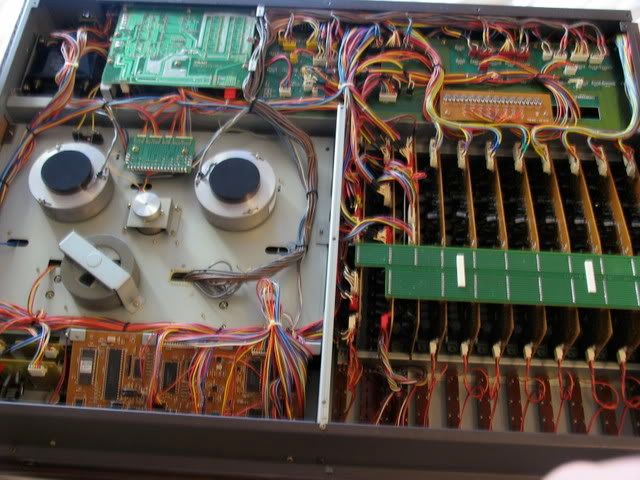
Step 1: First, power on your 388. Take off top cover of 388, behind the VU meters and above the in's and out's. Do it gently as to not harm your pride and joy.
Step 2: After cover removal, find the section of 7 trim pots (see photos below). They are above the tape window in a vertical orientation.
Step 3: Press play on your tape recorder.
Step 4: While tape is in motion, find the trim pots R 112 and R 212. These are the adjusters for the Tension Rollers.
A Reel Person's suggested Tension Roller orientation.
Quote:
"The centers of the tension rollers should be even with an imaginary line that's drawn and extends from the BOTTOM EDGE of the capstan and idler rollers."
For me, my tension rollers worked best a little lower than A Reel Person's suggestion.
Step 5: Watch the adjustments made to your rollers. Try playback fast forward and rewind. Work until you find an adjustment where everything is working well.
Step 6: Feel great about yourself because; no, it's not a dead motor, no, it's not the end of your 388, and yes, you just fixed your most prized recording possession.
The beauty of this DIY fix up, is that you can't really screw up your 388 in the process if you just stick to the aforementioned process. It's all mechanical and you can fiddle until it works up to your standard. Another positive thing, is that none of this altered my play/record speed and that's the most important thing on this board!
Now go record something!!!!!!
(Further clarification below from ?technoplayer ?-homerecording
Erock....Thanks for chiming in.
Here are a few snapshots from the manual which may help locate the necessary trim pots.
R112 adjusts the left hand tension arm.
R212 adjusts the right hand tension arm.
Before you adjust ANYTHING>>>>>> if you can
1) use a PLASTIC flat blade scewdriver or cover a metal one with tape. This will minimize you chances of shorting something out if your hand slips. Remember you are working on equipment with power applied!!!
2) Note the position of each pot BEFORE you make any adjustment.
3) adjust SLOWLY and in small increments. No need to crank the adjustment like you are screwing it in. A very small turn ought to do it.
*
*Sweetbeats said:
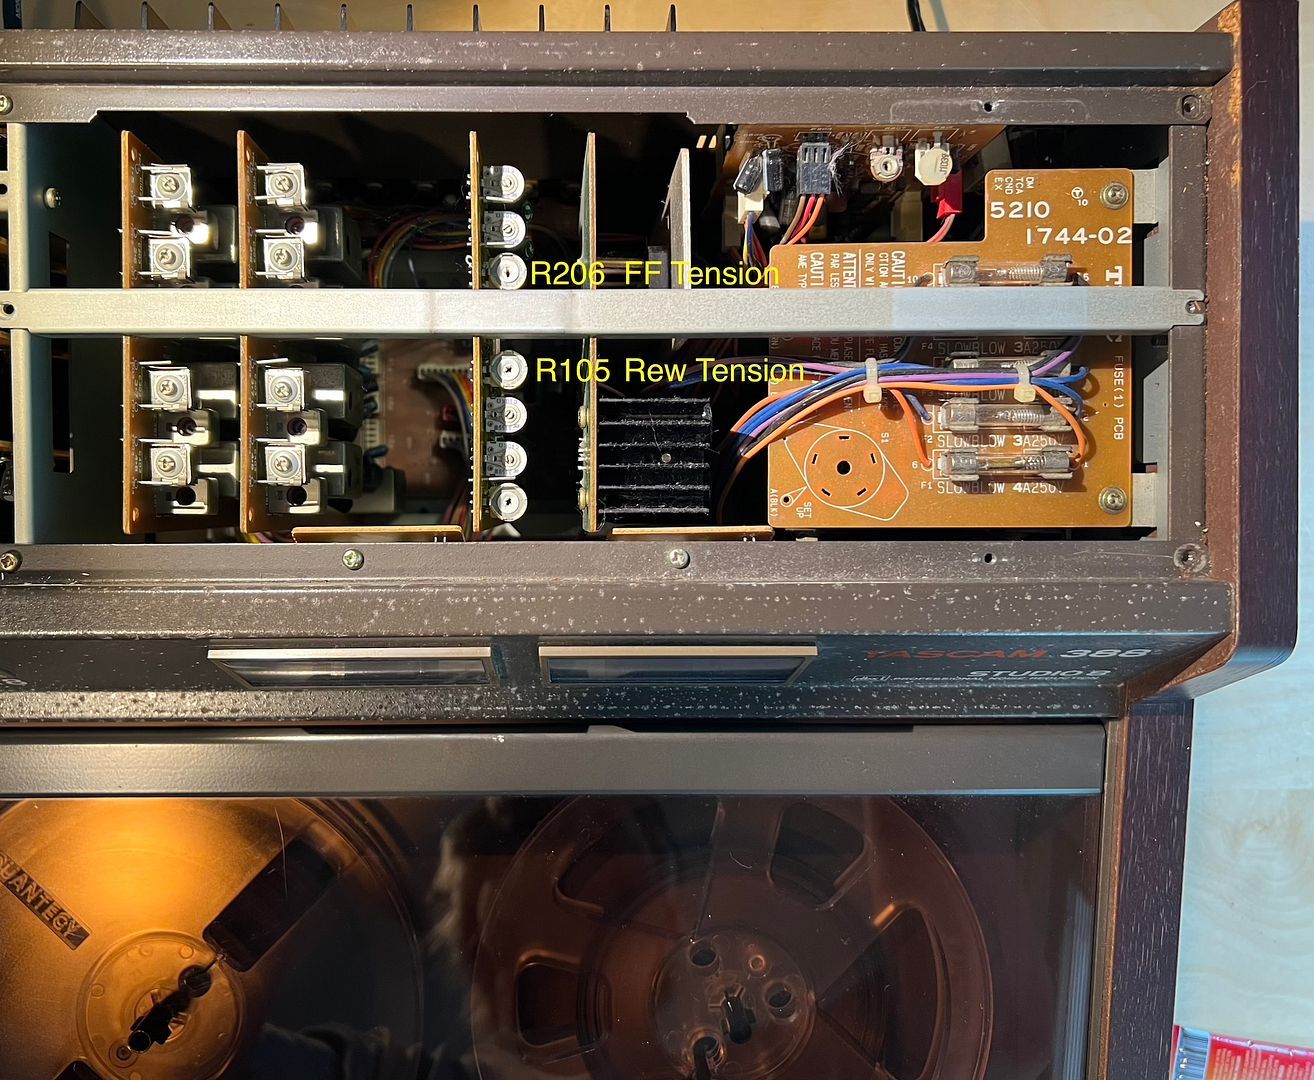
What I want fellow 388 owners to know is that there is a typo in the manual in the tape tension settings regarding the REW/FFWD tensions...the manual on page 1-9 in section 1-3-7 sub-sections A & B states that trimmer R105 on the reel servo PCB is used to adjust the tape tension in FFWD, and that R206 is used in REW. THAT IS BACKWARDS. R105 is used for REW mode, and R206 is used for FFWD.
photos courtesy "technoplayer"
______________________________________________________________________________
FAQ, Q & A and Troubleshooting
LINKS:
How to get started, no playback etc.
Mixdown Compression Tascam 388
Setting up a Patch Bay with a 388
Tascam 388 refurb and recap thread:"Sweetbeats" numerous pictures of the process.
Tascam 388 bias adjustment:"sweetbeats"
Tascam 388 Calibration and Bias info
various diagnosing/ problemsolving for a 388
Heads shot? Relapping! Relapping the two heads from a 388 runs $280.00. (as of 02/04/2011)
For and additional $50 they will create edge relief slots so tracks 1 and 8 don't wear unevenly.
388 "PGM" and "CUE" explanation, 388 mixer compared to a Tascam 488 cassette 8 track mixer more great explanation from "Sweetbeats"
Making a "Better" recording with a Tascam 388
_______________________________________________________________________________________________________________________[/b]
Using the Tascam 388 mixer as a DAW interface
Q: (Satuyrn of Homerecording) I am using a Tascam 388 as an external mixer into a Tascam US-1640 (Digital USB 2.0 Interface) on an iMac. I have the channels routed from each "SEND" in the "ACCESS" section of the 388 to each 1/4" LINE IN on the 1640 w/ 1/4" cables. My question is this:
Is the "SEND" of each channel on the 388 pre or post EQ / Fader?
Here's my dilemma. I started taking levels and with the trim knobs barely turned up, I am clipping on the computer. However, the VU meters on the 388 are not clipping (they're peaking nicely between -3 & 0). I'm guessing that the "SEND" is happening BEFORE the signal gets to the EQ / Fader, and that's why I'm having trouble. I've read recommendations in other threads to use the PGM Buses as an access point on the 388, instead of each channel's "SEND".
I can easily start using the PGM Buss Outs... but they are RCA's... so I'd have to replace all my 1/4" cables and re-route them w/ RCA to 1/4" cables. I'm trying to avoid this, but it wouldn't be the end of the world if I had to. It would be nice to know the info on each channels ACCESS section, though, in the event that I want to use them in another way, some other time.
A: (Sweetbeats of Homerecording)The SEND jacks on the 388 are post eq, pre fader.
The meters monitor the PGM busses, not the pre-fade level on the input strip so its not worth referencing them unless you run a known level test tone into the strip, check the level at the SEND jack and then adjust the level at the corresponding BUSS OUT jack to zero the meters to the input TRIM pot (and then you leave the channel faders and BUSS L & R faders alone).
This is all way too kludgey for me.
Either figure you ignore the meters and adjust the output sensitivity of the 388 at the SEND jack with the TRIM knobs and the input sensitivity of the 1640 with the input trims, or you use the BUSS OUT jacks (which is more ideal to how you are using the mixer IMHO) and just get 1/4" TS --> RCA adapters. Pretty cheap and that way you can still use your 1/4" to 1/4" TS cables.
By using the BUSS OUT jacks you:
Have the advantage of being able to use the meters to monitor the output of the 388 mixer
Can use the 388 input TRIM as it should be used (to maximize the input signal strength to the strip to keep the signal as far above the noise floor as possible rather than being tied to using the TRIM as a send level knob)
Don't have to pull your hair out trying to get adequate gain on the rest of the busses (i.e. EFF and AUX busses and main buss for monitoring) since it sounds like your input TRIMs would have to be set low which would force you to over-boost the rest of the gain stages and you'd be boosting a lot of noise from the input TRIMs since those would be lower to the noise floor.
_____________________________________________________________________
Q and A / Troubleshooting
How Do You Test Channel/PGM Buss Meters
1: Put tape on machine
2: Plug mic into xlr input on channel 1
3: Set mic/line/rmx selection switch to mike
3: Push channel one fader up into shaded zone (between 7 and 8.)
4: Push odd pgm master fader up into shaded zone (between 7 and 8.)
5: Push even pgm master fader up into shaded zone (between 7 and 8.)
6: Push stereo master fader up into shaded zone (between 7 and 8.)
7: To test the odd tracks turn pan control fully left and use the track assign buttons (1/2, 3/4, 5/6, 7/8.) and record function buttons 1, 3, 5 and 7 to send signal to a particular track
8: For even tracks turn the pan control fully right and use the track assign buttons plus record function buttons 2, 4, 6 and 8.
How do you Test Stereo Buss Meters
Repeat up to step 3, and then:
4: Push stereo master fader up into shaded zone
5: Press down L/R switch in Buss Assign section of channel strip.
(replies courtesy TapeOp member "Mark")
Q: Anyone know how to use the PGM BUSS INs?
A: If you're talking about the eight RCA ins in four stereo pairs, I haven't actually had a need to use them, but according to the manual and block diagram, their intended use is to hook up another mixer with it's own level controls, so they feed the eight busses of the 388 directly, AFTER the assign switches on the individual channels.
So to use these, you don't have any separate assign switches (those would theoretically be on the external device you're bringing). PGM BUSS ins 1,3,5,7 all feed the L/odd program master fader, while 2,4,6,8 all feed the R/even program master fader (but realize that even though you only have two faders to control the levels, the 8 buses are not mixed--they remain independent through to the program outs, monitor outs, and tracks 1-8 on tape).
The PGM BUSS ins are mixed with the corresponding numbered buss on the 388, so after the two master faders, each of the eight PGM BUSS ins, mixed with the same number 388 buss, goes to three places: straight to the corresponding program out RCA jack, to the corresponding numbered pot on the monitor section (through the "PGM" side of the "PGM/CUE" switch on the monitor section), and also to the corresponding track on the 8 track recorder.
Basically, this means that anything hooked to the program buss in RCA jacks is automatically routed to tape, so when you record enable a track, you are also record enabling whatever signal is present on that number PGM BUSS in RCA jack, which is already combined with whatever else you have routed to that numbered buss on the 388 mixer.
The obvious intention is to connect the PGM BUSS outs of another 8 buss TASCAM mixer to the PGM BUSS ins of the 388, so you could expand the number of channels you have feeding the 8 buses. Your other mixer would have the ability to set levels on each channel and assign each channel to one or more of the 8 buses, so you would have the same kind of control you have on the 388 built-in mixer.
(reply courtesy of tape op member ?adadan?)
Q. How do you bounce tracks?
A. (from TapeOp member "Mark"
Set the Mon switch to PGM, Set the Meter switch to the L/R position
Press the Assign switches that correspond to the track(s) you want to bounce to in the mixer channels that correspond to the tracks you want to bounce (so if you want to bounce tracks 1 to 4 to tracks 7 & 8 press Assign 7/8 on channels 1 to 4). Pan the tracks according to where you want to place the instruments in the stereo picture (obviously if you're bouncing to a single track just pan hard left or hard right depending on the track)
Set the input of the tracks you want to bounce to RMX.
Set the faders for the bouncee tracks, the PGM Master and Stereo Master to the shaded area.
Adjust the monitor gain for the target tracks to a comfortable listening level
Press the REC FUNCTION switch(es) of the target track(s). It/they should flash. Keep all other REC FUNCTION switches off
Play back your work and make any EQ adjustments you feel are necessary (don't do this whilst making the actual bounce). Note: this is where Return to Zero and Memory come in handy since you can set the song to loop whilst you tinker. Keep an eye on the meter(s) that corresponds to the target track(s).
When everything sounds satisfactory press PLAY and RECORD and sit back
When the bounce is finished disable to REC FUNCTION of the target track(s), rewind to the pre set 0 point and reset MON to CUE.
Listen.
I've bounced six tracks to two and not had any problems on mine.
Just watch your levels (keep them just below 0 on all channels) and you'll be fine.
Q. Is there a trick to loading the tape properly? I feel like I just guessed on it, but don't want to mess it up. I just kind of wrapped it and tucked in the end.
A: There's a little slot you can tuck the end into to get the reel wrap started. I tend to just try and hold it flat until I can wrap it with the next loop. Here, check these out..
http://www.youtube.com/watch?v=6AP69BMp ... re=related
http://www.truveo.com/How-To-Thread-A-T ... /792997515
Q: I recently had the machine serviced and it works great. One thing it does occasionally is kind of "jolt" when I start from a stop (either ffwd or play).
A: Mine does that too. Sometimes a little slack occurs in the course of stopping and starting the tape. When you hit play, that slack is taken up abruptly and pulled taught, triggering the transport to stop again. Not a big deal if it just occurs once in awhile.
A: "Sweetbeats" said:
__________________________________________________________________________________The "CHUNK" noise...You're talking about a mechanical noise from the transport? Any time you hit STOP or PLAY there are three solenoids that kick in or out with associated linkages and such, and they are indeed "chunky" devices considering the size of the transport so all is good if they go "CHUNK". Enjoy the positive mechanical action of your 388...mmmmmmm.
___________________________________________________________
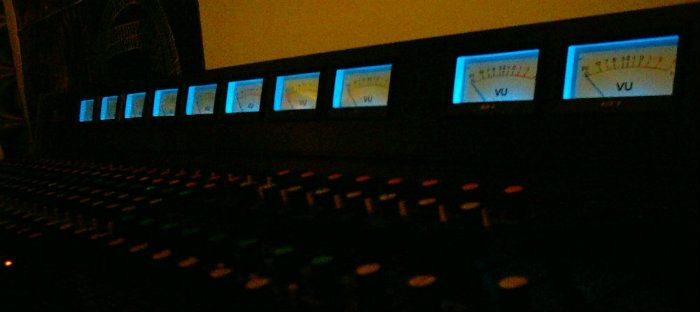
V/U Meter Light bulb Replacement
-"A Reel Person" Tascam Analog forum"Tascam VU bulbs are a tough issue. I've seen them at www.electronix.com under "bulb, Panasonic -or-like audio equipment", for about $1,25/ea, but I can no longer find them. Unfortuately, the smaller of the Tascam VU meters take solder-in bulbs. The larger Tascam VU meters often have a clip-in fuse-type bulb, (8V)."
-"sweetbeats" Tascam Analog forumI've done it on mine.
Its not too bad depending on what is not "too bad" for you.
You have to pull all the audio cards and dbx cards out as well as the balance amp and meter amp card...bias cards too IIRC...shoot maybe EVERY card has to come out...and then there are screws at the top inside of the card bay that hold retainer strips for each set of 4 meters. Depending on which meter has the dead lamp you may need to remove both sets of meters since they are hardwired together...but once you have whatever removed to get access to the meter the lense is held on by clear adhesive tape...peel that away and you can remove the lense and then heat up the soldering iron and swap out the lamp.
Replacing bulbs with LED lights
Rainbow Joaw's guide to replacing Tascam bulbs with LED lamps
________________________________________________________
Tracking Sheets for Tascam 388 in various formats, care of tapeop member klangtone:
http://www.thehabitat.info/Tascam388_TrackSheet.pdf
"It's 11x17. Hopefully people can deal with that. And hopefully your printers won't cut off the edges. It works fine on the printers at my work, but the copy machines at work cut it off a little.
I also uploaded a jpg and a Visio version:
http://www.thehabitat.info/Tascam388_TrackSheet.jpg
http://www.thehabitat.info/Tascam388_TrackSheet.vsd
If you have Visio, you can modify it yourself.
Let me know if you have any comments, good or bad.
One thing that would be cool is to have a section on the back where you could notate what you have hooked up to the EFF send/return and so forth.
But I figure for now, you can just write that kind of stuff in the Notes section.
share the love,
Roy (klangtone)
ps. RIP Kurt Vonnegut..."
________________________________________
TAPE info
When the 388 was being developed, they used the Maxell UD 35-90. 407 is the Quantegy equivalent, Both work fine.tascaman wrote:Two more questions:
Maxwell UD 35 - 90. It was described here that it was the tape that was built for the machine, vice versa... Is it still ok to use, or is 407 and 457 better?
The 388 can also be set up to run +6 tape like Quantegy 457 and it's equivalent RMGI LPR35. If you get your deck setup, Tascam support and the tech who worked on mine recommend setting it up for these hotter +6 tapes as they will give you more headroom.
If you are going to use dbx, you are only going to want your levels to average at 0 db so the dbx doesn't mistrack and cause nasty artifacts.
However, if you want to bypass the noise reduction on record and playback and get highest signal to noise possible without it, you will appreciate the higher headroom.
Or mix'n'match. For example, use the dbx on 1-4 and off on tracks 5-8, whatever suits the track.
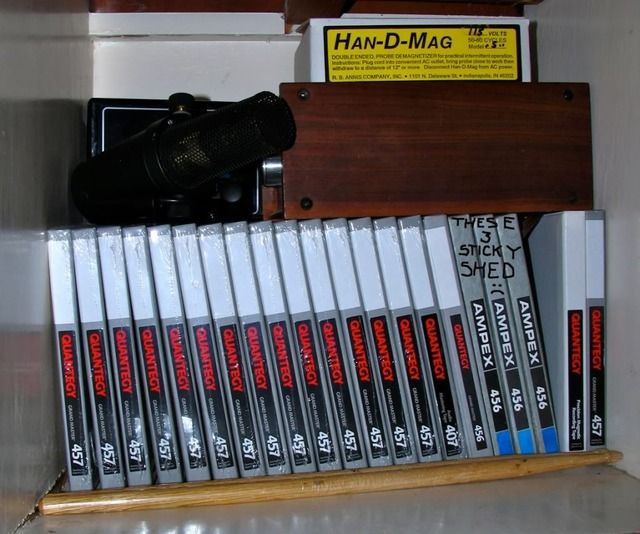
_______________eh91311 wrote: The 1.0mil thick 7" tape stocks (Quantegy 407, 457, RMGI LPR35) is thinner than 1.5 mil thick types (Quantegy 456) and more subject to print-through, or "ghosting", which basically is hearing sound from previous tracks' recordings on playback. Store the tape tails-out, which means play through to the end, store that way, rewind to the beginning to use; this can help deter print-through.
Avoid Ampex and save yourself the heartache. Even if you bake a sticky-shed reel, it will regress to it's pre-baked condition, so don't bother. People pretty much only bake to make a reel playable and transfer pre existing recordings that would otherwise be lost.tascaman wrote: Also, what is/is there a difference between Ampex 407 to Quantegy 407? I have heard that Ampex tape has the sticky residue these days, and it is best that you bake it before use.
Thanks,
Conrad
Quantegy is not producing at the moment/ever again(?) depending on who you talk to.
RMGI-EMTEC is the alternative now.(and locating good condition non sticky-shed used tape).
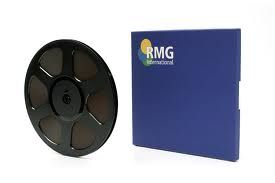
"This is the long awaited RMGI-EMTEC LPR35 from Holland and is the replacement for Maxell UDXL35 and AMPEX (QUANTEGY)457 open reel tape, yet you can record 3 dB hotter on this tape than the Maxell. This precision slit and coated tape is similar to 457 in operating level (+6), and is being made by some of the same people and on most of the same equipment that made the famous EMTEC LPR35 in Germany. This tape is the same as SM911 except on a thinner long play 1 mil base. Each tape has 1800' of 1/4" 1 mil back coated tape on a standard 7" plastic reel in a standard RMGI-EMTEC box. Made in Holland."
--------------------------------------------------------------------------------
Take-Up Reels:
Audio Proz reel selection 7" blank take up reels for 1/4" tape:
"ITEM 44416 7" empty plastic reels Clear plastic with cases. Many, many, many available. $1 a pop."
/U.S. Recording 7" blank take up reels for 1/4" tape, 5 pack $19.99
________________________________________________________________
Dbx Noise Reduction
All About Dbx Noise Reduction
"It seems hard to believe now, but at one time the type of noise reduction process you used was as vital to the success of an analogue multitrack recording as the size of your hard drive is today! Professionals enjoyed the relative merits of noise reduction systems such as Dolby A (or the much improved Dolby SR later) or Telcom C4, while the home studio tended to use equipment fitted with Dolby B or Dolby C (and a few late models with Dolby S), or with one of the Dbx formats (Type I or Type II).
The basic idea of all these systems was to reduce the dynamic range of the input signal in some way prior to recording to tape. On replay the inverse process was used to restore the original dynamics (more or less) while also reducing the apparent tape noise into the bargain. The success of such systems was variable, though, and the best (Dolby A initially, and subsequently the remarkable Dolby SR) are technically complex and tackle the audio in several independent frequency bands to maximise control and minimise modulation side-effects.
The Dbx noise reduction system was relatively simple in comparison and, although not so widely used in professional circles, was adopted readily in the semi-pro markets. These Dbx systems, developed by David Blackner in the early 1970s, essentially employ a wide range 2:1 compressor on the record side, with a complementary 2:1 expander on replay. Since the 2:1 ratio is used over the entire dynamic range of the input material, there is no critical threshold requirement, and so no need to accurately match record or replay levels when tapes are moved between machines. This has always been one of the drawbacks of the Dolby systems, and this is the reason why Dolby tone is recorded at the start of multitrack tapes in professional studios.
In any broadband noise-reduction system such as Dbx, dynamic changes caused by a low-frequency source ? a bass solo, say ? will result in the level of tape noise being modulated, and with no high frequencies in the recorded signal to mask it, high frequency tape noise will become very obvious. To overcome this significant side effect, the Dbx system applied pre-emphasis (high-frequency boost) on the record side and a corresponding de-emphasis on replay. The idea was to reduce the audibility of high-frequency noise generally, and so the pumping artefacts of the companding process were less audible.
On a good day, with everything set up perfectly, the Type I system was capable of providing as much as 30dB of noise reduction ? far more than Dolby A ? although it was prone to audible side effects. The difference between the Type I and Type II formats comes down to the details of the level sensing circuits used to control the compression and expansion processes. Type I was optimised for high-quality, wide-bandwidth open-reel recorders, whereas Type II was designed for the rather less reliable results obtained from cassette recorders. Consequently, Type II noise reduction was not as powerful, and more prone to mistracking side-effects.
Whereas the Dolby systems only compressed low-level signals which were in danger of being lost in the tape noise, the Dbx system compressed everything regardless of level and, although far simpler and cheaper to make, this was also the system's primary weakness. If the recording medium was entirely linear at all levels, a 2:1 expander would always undo the dynamic changes applied by a 2:1 compressor, so the replayed signal would be identical to the recorded signal (ignoring the problems of compressor overshoot and the like). However, as we all know, recording tape is anything but linear, especially at higher levels where tape saturation occurs. The saturation effect means that a high-level input signal is replayed at a lower level and with a different frequency response (and more distortion). Since the expander can only work with the signals found on the tape, the original (but saturated) high-level signal ends up being decoded incorrectly. This is known as a 'tracking error' since the dynamic reconstruction of the expander fails to track that applied originally by the compressor. Tracking errors can also be caused by drop-outs, an azimuth error, or if the machine is not equalised correctly for the tape being used, and typically result in a dull and dynamically compressed (or 'choked') sound.
So, whereas the usual advice is to drive analogue tape fairly hard (even when using Dolby noise-reduction systems) to obtain the best noise performance and the often desirable characteristics of tape saturation, try this with a Dbx system and you will be badly disappointed! For this reason, many recorders that use Dbx have switches to disable the noise reduction on some or all channels, so that good old-fashioned tape saturation can still be used creatively if required. It is also a good idea to switch the Dbx off if recording transient-rich instruments such as percussion, since the companding may mistrack on fast transients.
When Dbx noise reduction is being used, it is generally wise to err on the side of caution when setting levels. Keeping peaks below the point of saturation gives the expander the best chance of reconstructing the original signal properly. This usually means 0VU is the absolute maximum level, rather than the average value to aim for, and recording at a slightly lower level than you would without Dbx isn't really a problem as the amount of noise reduction is so great anyway. It is also vital to keep the tape heads clean and demagnetised, and to have the machine serviced regularly and aligned correctly for the type of tape you are using, to ensure that what goes in comes out properly." Hugh Robjohns - SOS mag article excerpt
TapeOppers weighing in on dbx with the 388
joel hamilton said:
I recorded a ton of stuff on one of those. I never used the NR. Just print bright and turn down the top if you are getting too much hiss.
I just learned to track bright as fuck with that machine, and then attenuate the high end a little, rather than throwing a wet wool blanket over everything by using the NR.
I always thought the NR on that machine was a joke, like a lowpass set to 5k, rather than a dynamic companding system like SR.
Make your own decisions, but I always hated the NR on those things. The amount of hiss I got was directly proportionate to how bright I printed the sounds in the first place.
Just thoughts.
Record stuff.
eh91311 said:
I'm no expert. It's your machine, do with it whatever sounds best to you. If you like the way your 388 sounds with no DBX, leave it off. I've tried it that way, but I didn't like the hiss level on playback.
I've found that you can't slam the meters or record at or over 0 VU with narrow-format recorders like the 388 and MSR16 because the DBX will mistrack and over-accentuate the compression and expansion effect, compressing the sound more on playback and rounding off the top end. Leave 2-3db or so of headroom and the DBX can work on reducing the noise floor and doesn't overly "warm" the track so much. The DBX still affects the sound, just not as much as when hitting the track hard.
"The Ghost of FM" Tascam Forums said:
The dbx noise reduction is a key element in the overall quality and performance of the Studio8.
It is basically responsible for the elimination of all tape hiss and much of the internally generated modulation noise. It also allows for far less adjacent channel crosstalk or bleed-through so that you can better isolate a singular track in the mix and not hear its neighboring track(s) playing in the background.
dbx also provides you with a flatter frequency response as it allows the recordings to be made at lower levels where response curves are much flatter and distortion levels much lower as well.
Keep in mind that the Studio8 is indeed a narrow track format machine and was designed for tape economy as one of its paradigm features. dbx is a true benefit feature for that machine and even of much benefit to the 388's bigger brothers that have wider track widths and faster tape speeds.
The only open reel machines I would suggest not needing dbx would be half track stereo decks which have hotter calibration setups and wider guard bands in-between the tracks to reduce bleed-through."
"ithicadude" Tascam Forums said:
"jjones1700" Tascam Forums said:I've been recording with the 388 for about a year, and lately without the dbx. What an amazing improvement! I SAY FORGET THE DBX!! without it you can push the levels quite hard and get some nice compression, and the playback is MUCH more realistic--clear and with no pumping or swelling or wet blanket effect. also, I think it's important to not let tape hiss become some sort of horrible bogeyman--it's OK to have a little hiss--IT'S TAPE, AND WE LOVE TAPE!! And the feeling of simply getting back what you put in is much more honest. try it. hit the tape hard you'll be happy.
Tascam 388: Use DBX or not?I agree that dbx isn't always needed. If you are recording material that doesn't have quiet passages near the noise floor, dbx isn't really necessary. If you've got some pauses or quiet (relatively) acoustic stuff going on, dbx can keep the hiss from being front and center.
You Leave 1000x, repetitive instrumental circa 1988
Example of 388 recording made with dbx "on" while tracking, "off" on mixdown.
( from an old cassette copy of the tune. Will have to bake that Ampex 456 reel one of these days...)
Link to preview of excerpt pages from "Tascam: 30 years of Recording Evolution" with pics and historical writeups on the products and technology of the 1979-1990 era.
________________________________________________________________
Bias, +3, +6,...+9 "hotter" tape, tape compression, cleaner vs warmer...etc.etc..as it applies to the 388

Just thinking out loud here with hypotheticals, and trying to get the facts straight as far as what would be required for running high bias modern tape on the 388.sweetbeats wrote: Modding is neat and fun, but is in no way a guarantee of better results, and opens the door to irreparable damage.
Thin 1800 foot tape would be out because of the higher output and print through issues, so a thicker backing would be needed.
Thicker, stiffer tape would be harder on the motors and heads. However, 456 is used by many on their 388 without issue. How much thicker and stiffer is high performance tape like GP9? Any high bias 1/4" formulas known for their supple transport travel?
Also, would the stock cards be adjustable enough to handle the signal? Are the 388?s electronics capable of being set to accept the levels and biasing for such high performance tape?
These things I ponder -M
sweetbeats of homerecording wrote: Quote:
456 is used by many on their 388 without issue. Is it the same thickness and stiffness as high performance tape like GP9?
GP9 is about 0.2mil thicker (456 = 1.93mil total, GP9 2.13mil)
Quote:
would the stock cards be adjustable enough to handle the signal? Are the 388?s electronics capable of being set to accept the levels and biasing for such high performance tape?
Ultimately you'd have to try it out, but here is what I am pretty sure you will find:
* That the bias amps are either not robust enough to pump the bias level, or at the very least you'd need to mod the bias cards to allow more current which is what is necessary in the likes of the 58 and MS16 systems...not sure about later decks. I would be really surprised if the 388 bias amps had enough headroom to bias "+9" tape, and if they do there is always the question as to whether or not you are going to damage something by running it at that constantly. Think of a car...yeah the tach in my old Subaru says I can wind the engine up to over 6,000rpm, but we all know if I drove it around like that all the time it would most certainly (and I believe drastically) reduce the life of the engine.
* Even if you could get the bias issue resolved (assuming there IS one), I betcha the R/P amps would be stretched before being able to take advantage of the headroom on +9 tape. I bet it would work, but there may be sonic artifacts that leave you going "was this worth it?" Remember, program peaks, especially on things like percussion, are WAYYY over the nominal level...that's why you see the peak LED's flickering and the VU needle is hardly pushing 0...those peak LED's typically light at +10 or +12. Now let's say you cal the deck using a 355nWb/m standard, now those same peaks will be at around +13~+15 maybe? That's getting up there. Not sure at what level the 388 R/P amps clip. The amps in my Ampex MM-1000 aren't rated to clip until +28 or +29 and I'm pretty sure the 388 amps aren't up in that range. If the goal is to get tape saturation then you want to leave enough headroom in the setup so you stay far away from overdriving the electronics.
YMMVyadayadablahblah.
I realize you are just thinking "out-loud" so I don't want to sound like I'm over-reacting to your musings, but the reality is that whatever discussions we have had on this forum over using +9 tape on any number of 1/2" 8-track decks from Tascam would certainly be more acute with the 388 since it is a transport very explicitly designed for "1.0mil" +6 tape. I just don't see the benefit of "going-there".
Somebody tell me if I've got it wrong...the only substantial reason to use "hotter" tape is to increase headroom to create greater sonic distance between the program level on tape and the noise floor...right? Tape formulations on +9 tapes may elicit a different or specific "flavor" but the whole hoo-hah about higher and higher output tapes is NOT because the tape in and of itself is "hotter" or "phatter" or "louder" or "dripping with tape 'compression'" or whatever...its just simply this:
The higher the tape rating (the consumer +3, +6, +9 figure), the more signal the tape can handle before presenting a industry standard distortion rating of 3%.
This means that the recorded material can be tracked "hotter" on that tape than a lower output level tape and still be "clean" and since the tape noise does not increase with a "hotter" tape you've just gained more distance between your program material and the tape noise.
So if low noise is an issue (i.e. tape hiss), then maybe +9 or greater tape is the solution. If you want crunchy-yummy tape distortion on a 388 then maybe 407 is the answer...print-through is an issue on thinner tape. 407 is a 1.0mil +3 tape which means you'll be able to drive the tape into distortion (hopefully nice yummy third-order harmonic distortion) while being more kind to your R/P amps AND while keeping print-through from being as much of an issue. YES you are closer to the tape noise floor but my guess is that if you (not YOU specifically , shed, but whoever is reading this) are wanting to push/saturate the tape you aren't tracking solo acoustic guitar...it is probably something with drums and electric instruments and I challenge you to hear the tape noise on properly biased 407 as the cymbals rage and the guitars crunch. Yes there are all levels of dynamics and tones in the music style I'm hinting at but I'm just trying make a point with that example.
No matter what, ANY machine and tape selection is going to be a process of compromises but if you are clear on what you are going for it should be obvious what tape to use and how to use the machine within its scope, and for most stuff I'm thinking LPR35/457 is ideal for the 388 and if it was high energy stuff I might even try using a LOWER output tape like 407.
Am I discouraging you from trying? I hope not. You might love the result and if that's the case more power to you...I'm just trying to make the point that the desired performance or result from the machine may be achieved in a much better way that seems backwards by being mindful of the tape selection and understanding what the numbers really mean. You might try GP9 and compare to to 407 and like the latter better because the deck itself isn't running at "7,000rpm" or even "5,000rpm" and the results you hear are the tape being pushed rather than the electronics.
Am I knocking folks who mod their decks to properly bias and drive higher output tape? Certainly not! I just know after going through all kinds of thoughts about "I wonder if..." and "I wonder what..." I came to realize that most of the time it wasn't worth the hassle when I considered all the unknown variables and when I came to understand the drivers behind the super-high output tapes, and when I came to understand what the numbers mean and how to use operating level to my advantage.
Know and understand your goal and the purpose behind it. Then choose the path to get there.
I'll use evm1024 (homerecording member) as an example...he's modding/modded the bias circuit on his Tascam 58 R/P cards to properly bias super-high output tape. This is a known solution to a known issue with those amp cards when using +9 tape...the bias amps can handle it but the (Ethan, correct me if I'm wrong here) feedback loop in the stock bias trimmer circuit provides for a trim window that, at best, just barely biases +9 tapes. In most cases it doesn't quite get there. The mod adjusts that window by raising the ceiling on the feedback loop so that the bias level trimmer can dial in more gain. This also means that that "window" may now be to high for lower output tapes because the low end of the trim range may now not be low enough, sending too much bias to low-output tapes. That's the compromise. But outside of that we know (by field-tested results and educated analysis that people like Ethan possess) that the bias amps are safe to produce that level on a routine basis. And WHY did he do it? Ethan has a focus on tracking acoustic instrumentation...classical compositions...he likes pipe organs too. These are sensitive sources that often leave tape noise exposed and can be problematic with nosie reduction. Higher output tape is the natural solution. The bottom line is that he's got a specific need to use hgher output tape and is educated and experienced in the area of electronics to be able to design the circuit level solutions.
Getting off the box now. And I CERTAINLY hope this doesn't feel like I'm lecturing you, shedshrine...What I'm saying is (hopefully) for the good of the order and I'm just sharing things that have come to settle in my mind as a result of the same kinds of thoughts and questions you are pondering and posting. So thanks for the question. I feel it is a really, really good and important topic.
Fantastic response and info Cory, and much appreciated. That clears up a big gap in my knowledge, and I?m sure helped out many others. I can remember Daniel "Cjacek" (homerecording) touting the thrills and joys of 407 all along, and I still went ahead and grabbed 15 reels of 457 upon Quantegy?s demise, because, hey man, it was the ?hotter? tape.
Now I finally realize, in the case of the Tascam 388, it?s all about pushing +3 tape for maximizing tape compression, if that?s what you?re after, while minimizing any stress the 388?s electronics (or messing up the dbx tracking with obscene levels if it's on), and that hotter tape just means a higher level clean signal before saturation/distortion. Big "aha!" moment..Many thanks!
_____________________________________________________________
388 HEADS info

Here's what a new 388 record/playback head looks like (from earlier in this thread).
Also notice the tape lifter to the left and the guide to the right are smooth with no flat spots yet.
Tascam analog support said the last replacement heads they had were sold out in 2003.
He also explained that after they tool up for production and the run ends, the tooling blocks are scrapped so that's that.
JRF magnetics no longer carries them, as the originals are sold out and their current supplier could not reproduce them to Tascam's original specs,
crosstalk noise was unacceptable. "Tascam was really proud of that head design".
He went on to say that relapping the two heads from a 388 would run $280.00. (as of 02/04/2011)
For and additional $50 they will create edge relief slots that will help prevent the tape edges riding harder on the outside edges causing tracks 1 and 8 wear the head faster.
FOSTEX COMPATIBILITY
pacrock wrote:
Is there any chance a fostex head can be modified/mounted on the 388? fostex made a whole bunch of 1/4" 8 track machines - more so than tascam - they may have a bigger supply of leftover heads...
any thoughts?
"Hey I just talked to Jimmy in analog support at Teac in Cali. He said the engineering docs are MIA on the 388 and that's the only place where the track width would be found for the 388. He says they purposely didn't put it in the manual because it was a proprietary head design...different than the Fostex 1/4" 8-track. They aren't compatible (at least not completely)."
-Sweetbeats of homerecording.com
________________________________________________________________________________________________________
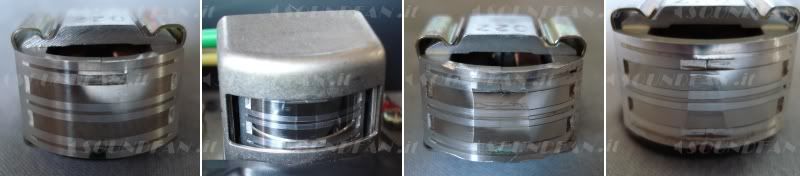
Not heads from a 388, but good example shots of head condition:
"The following pics show a brand new head (A),
a used but at 80% still very good condition head (B),
a totally worn head in regular way (C)
and a totally worn one in wrong way due to zenith angle problem (D)."
http://www.soundfan.it/en/tips&tricks_en.html
_______________________________________________________________
TAPE-STICKY SHED SYNDROME info
National Technology Alliance Library on sticky shed syndrome
http://www.clir.org/pubs/reports/pub54/2what_wrong.html

Figure 2. Cross Section of Magnetic Tape Magnetic particles are held together with a binder coated on a film substrate. Lubricant and other agents (not shown) may also be included in the top coat layer. A back coat may also be added to control friction and static charges. The structure of the top coat is analogous to that of Jell-O filled with grapes where the grapes represented the magnetic particles and the Jell-O represented the binder.
The binder also has the function of providing a smooth surface to facilitate transportation of the tape through the recording system during the record and playback processes. Without the binder, the tape surface would be very rough, like sandpaper. Other components are added to the binder to help transport the tape and facilitate information playback. A lubricant is added to the binder to reduce friction, which reduces the tension needed to transport the tape through the recorder and also reduces tape wear. A head cleaning agent is added to the binder to reduce the occurrence of head clogs that result in dropouts. Carbon black is also added to reduce static charges, which attract debris to the tape.
The backing film, or substrate, is needed to support the magnetic recording layer, which is too thin and weak to be a stand-alone film layer. In some tape systems, a back coat is applied to the backside of the tape substrate layer.
A back coat reduces tape friction, dissipates static charge, and reduces tape distortion by providing a more uniform tape pack wind on the tape reel
Binder Degradation
The binder is responsible for holding the magnetic particles on the tape and facilitating tape transport. If the binder loses integrity - through softening, embrittlement, loss of cohesiveness, or loss of lubrication - the tape may become unplayable. Sticky tape and sticky shed are commonly used terms to describe the phenomenon associated with deterioration of the magnetic tape binder.
The binder polymers used in magnetic tape constructions are subject to a chemical process known as hydrolysis. In this process, long molecules are broken apart by a reaction with water to produce shorter molecules. The shorter molecules do not impart the same degree of integrity to the binder system as do the longer molecules. As in a wool sweater, if enough individual yarns are cut, the sweater will eventually fall apart.
Specifically, it is the polyester linkages in the commonly used polyester polyurethane-based binder systems that undergo scission (are broken) by water molecules. Water must be present for the hydrolysis reaction to occur. Furthermore, the more water that is present, the more likely it is that polyester chains will be broken. The binder polymer will absorb water from the air. It will absorb more water in a high humidity environment than a low humidity one. This process is analogous to that observed for open bags of crackers, potato chips, and breakfast cereals: They will loose their crunch quickly on humid, summer days (80 to 90% RH) as they absorb high amounts of moisture from the air. In the winter, however, indoor humidities generally can be lower (10 to 20% RH), less moisture is absorbed from the air, and the snacks never seem to get as stale.
_____________________________________
Which Ampex (and other brands) tape is sticky shed tape?
Tim Beck of homrecording:
Sticky Shed help thread
The binder problem known as sticky-shed-syndrome (SSS) did not manifest itself in the ?80s when the tapes were new? it took several years for tape to breakdown. It breaks down whether used or still sealed new-old-stock.
It affects all sizes of 456/457, 406/407, as well as other brands and types from ?? to 2?.
If it?s in the worst stage of SSS it?s a mess to get the tape path clean.
If a tape has a binder problem it will usually slow the machine down -- maybe even stop it. When it does run it may make a squealing sound. Really bad shedding will leave thin strips of tape and obvious sticky residue behind on the tape path. You can hear it peeling off. It's really awful.
Late 1994 is officially when Ampex changed to the new formula. Anything before that could develop sticky-shed. The reason you hear more about tapes from the 70's and 80's is because it takes time for the binder to deteriorate. Also the whole mess was discovered when studios tried to use archived tape from that time period to remaster and release old albums on CD.
Magnetic Reference Laboratory (MRL) puts the new tape at anything after early 1995 -- probably just to be on the safe side.
"I've never personally had any Maxell XL that had the binder problem. I've had problems with all my Ampex 456 from 1986 through 1993 production. 1994 and after is still like-new."
"A lot of the 7" don't have date labels on the outside. Check the address on the back. It will either say Opelika Alabama or Redwood City California. If it says Opelika it's good. It might be good even if it says Redwood City, but they changed the box style a little before they changed the formula, so some with that box style are vulnerable to sticky shed.
The ones with the AMPEX logo in the middle of the box are from 1993 and older. They are using the old binder. There?s a good chance the box with the logo across the bottom will be fine. Unfortunately, the date for those is usually on the hold-down tape on the reel, which means you have to break the seal to see when it was made. The catch being the tape is no longer ?sealed in box? after you?ve checked. "
-Tim
_______________________________cjacek of homerecording:
Nor do "Whale Oil" lubricated tapes, such as the Maxell UD line. The problem seems to be only with the backcoated mastering tapes that used urethane binders. The only tapes that get sticky-shed are non-Japanese backcoated mastering tapes from the seventies and early eighties plus certain pre 1995 (1986-1993) Ampex tapes. Quantegy doesn't have this problem as it uses the new improved binder.
~Daniel
Tape Baking
If you have stuff recorded on sticky shed tape and want to save it, get a food dehydrator and bake the tape:
http://www.tangible-technology.com/tape/baking1.html
audio-restoration.com on cause and cure of SSS
____________________________________________________________________
MODIFICATION
In case you've ever wondered what it would be like to electronically trick one of these out, this guy did it...
(Sold 06/21/09 for $1245.oo on ebay)
"Your one-time opportunity to own
a professionally (and intelligently) upgraded 388"
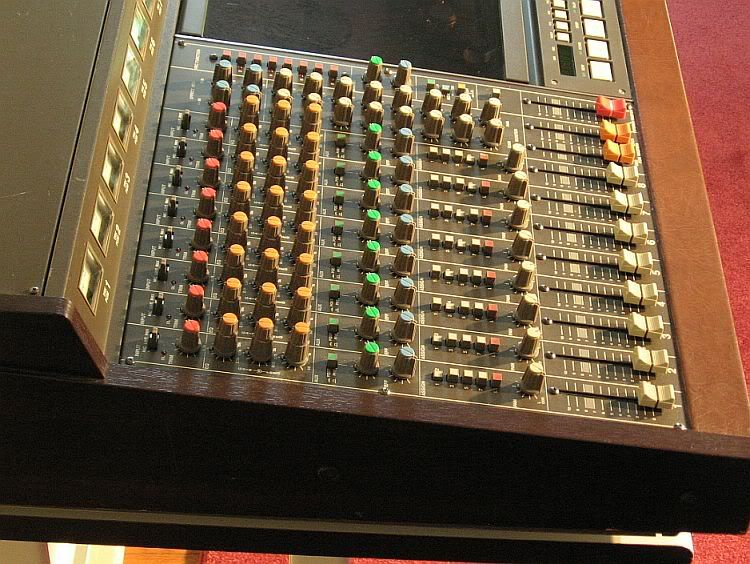
"You pretty much know what a Tascam 388 is, if you're looking at this page. Eight analog tracks on affordable and available 1/4" tape; with a full mixer included.
There's a lot more to it than that. There are mic preamps on every channel. The three eq controls on each channel are ALL sweepable. You can plug in to the channel or straight to the bus (more about that later). You can come right out of the tape preamp if you want, evading another pass through the channels, for higher fi. You can sync two 388s together. You can return to zero or to a cue point. There's an effects bus, a selectable pre/post aux output, and a separate monitor mix. And more, plenty more. This is not just a big Portastudio -- it is a real comprehensive tool for real work in real production facilities.
So what makes this particular 388 better than the others?
It has been Pooged. Pooge is an expression devised by Walt Jung, the engineer who researched and publicly exposed BOTH of the two most significant bottlenecks in quality audio in the chip age: Slew Rate limits and Dilectric Absorption. In this 388, all the channel op amps have been upgraded to 5532s, which are a fine-sounding audio chip whose imperfections are, for an IC, remarkably tubelike. And every one of these 5532s have been bandlimited (~70 kHz) to maintain closed loop performance to the limits of the chip itself. With expensive mica capacitors. You'd be surprised how seldom this is done, and how often manufacturers allow op amps to go into open-loop operation, which sends all kinds of spurious trash down into the audio.
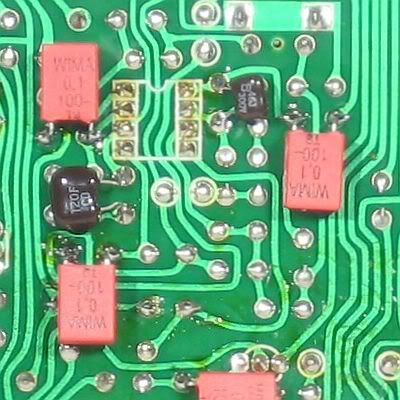
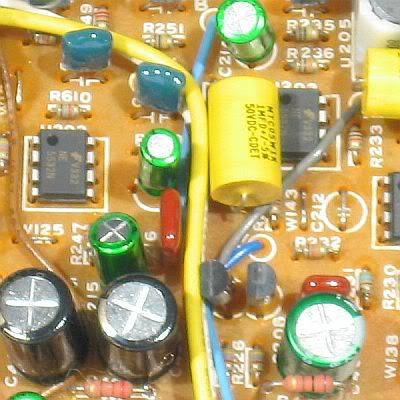
Furthermore, each coupling capacitor position has been meticulously recalculated (considering every possible load on every output) so as not to have an unnecessarily large (and overly problematic) cap at that particular point. And each of those caps has been replaced by a Nichicon Muse high-fidelity cap (except a couple of positions where a mylar film capacitor would fit). AND, each of those new capacitors has been bypassed with a WIMA polypropylene capacitor, calculated to carry the majority of the signal, leaving only the bass to the Nichicons.
And by the way, those 388 preamps sound great, with fat and juice that (pardon me for saying it again) is almost tubelike.
And by the way, the local power supply capacitors on the cards have been significantly increased with larger high-quality Muse components as well.
And by the way, all this work had been done by an annoyingly meticulous tech who became a tech because nobody else could do work that was acceptable to him, him being me.
The 388 will come with an original owner's manual with all setup information, full schematics (with a couple of corrections by Yours Truly) and circuit board layouts.
AND....THERE IS MORE....
I'll also put in a couple of auxilliary boxes I made for this machine. One of them has a 1/4" phone jack and a bunch of output tails that plug into the bus inputs available at the back, so you can 100% bypass the channel and go right to the r/p cards. The switch selects which bus you want to connect to. The cables are unshielded, presuming that you are using solid-state (~150 ohm) sources like op amps). They are, if you care, 99.99% pure copper in polyethylene in